This article applies to hosting related actions on our older Minimus, Medius, Maximus plans controlled through https://cp.blacknight.com.
For how to do this for newer plans see here: Add a domain to Mega, Giga, Tera, Wordpress plans
This will work even if the domain is registered through us but for whatever reason is not set up on any cp.blacknight.com hosting package yet.
If setting up hosting on your domain via Shared Hosting, please follow the steps outlined below - note that these actions are carried out via the Hosted Domains section in your account, where you can reach that section via the following steps:
- Click Home (Menu).
- Click Hosted Domains
Step 1: Ensure the domain is available in your Hosted Domains section.
.Review the list of domains, if the domain name is not listed, click Add Registered Domain - otherwise skip to the next set of instructions.
- In the Domain box, enter the domain name (without the www part).
- Choose the subscription to set DNS Hosting to - or leave default. if unsure.
- Select Zone management ability - in order to allow you to control DNS records.
- Under Web Hosting: Hosting - leave this set to None (for now).
- Click Next and then Finish to complete the process.
Note:
When following the process to Add Registered Domain, you may encounter: "Domain with such name already exists.".
What this means is that the domain you are trying to add is already added to an account, via the Hosted Domains section. Perhaps the domain is in your account already, where you should re-check the list under Hosted Domains to determine if this is the case. However, if the domain is not listed in your account, you will need to contact us to discuss this further.
Step 2: Add Hosting to the domain
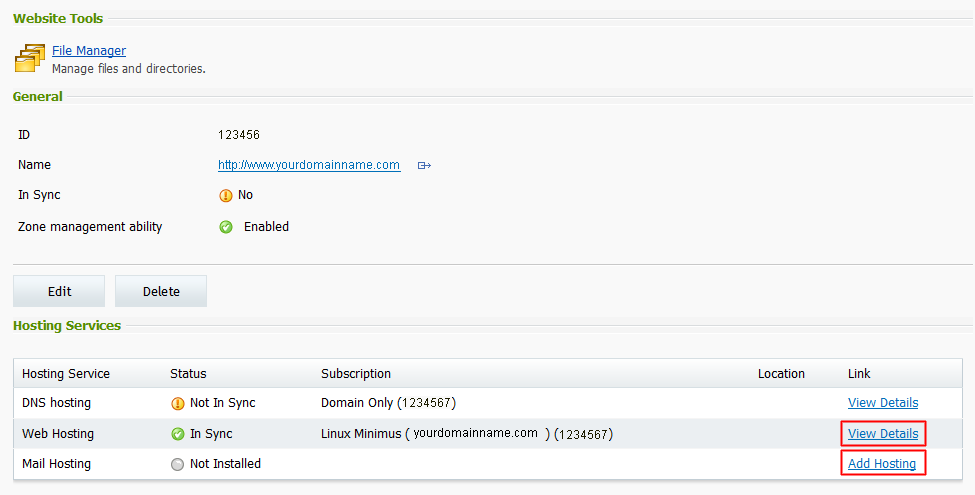
At this point you should have an entry for your domain, under your Hosted Domains section - if not, please review Step 1 above.
- Click into the domain.
- Click Add Hosting to the right of Web Hosting (below Hosting Service):
- If Parking, or anything other than Website Hosting, is already added you will see this listed on the screen and you will not have the option to "Add Hosting".
- If this is the case, click "View Details", then "Change Hosting".
- Chose the relevant hosting type you require:
- None: No hosting of any kind is setup i.e. DNS records only.
- Parking: Will simply show our standard parking page on your domain.
- Single Page Website: This allows you to host one webpage, of HTML markup.
- Frame Forwarding: You can mask the target with your domain name, within a iFrame.
- Standard Forwarding: This would redirect your domain, to the target, using a 302 Redirect.
- Website (Apache): This would be actual Website Hosting, for where you upload files and add Site Application installations.
- Note: There may be other options here also, please contact us if you are unsure of what you should select.
- Continue the process by clicking Next.
- The next screen's output is dependant on the selection you chose previous - follow the steps provided.
- Parking: Simply click Finish.
- Single Page Website: Enter the full HTML markup code, that you would have for a single html page.
- Frame Forwarding: Enter the full URL to the resource you wish to Frame Forward your domain name to.
- Standard Forwarding: Enter the full URL to the resource you wish to Standard Forward (302 redirect) your domain name to.
- Website (Apache): Ensure you choose Create new webspace and leave the location set to your domain name.
- Click Next when ready, then follow the instructions on screen to complete the process.
You will see a screen similar to the following once complete:

Step 3: Setup your FTP access
Assuming you have not already set this up - when configuring the domain, and where you have added Website Hosting to your domain, you can then add FTP access to your domain: follow the steps provided:
- First, select the correct subscription from the Subscription drop-down (top-right, under your Account ID).
- Click Websites (Menu).
- Click into the domain name.
- Click FTP access.
- FTP Login Name: You should create a username as all lowercase, with no spaces.
- Password: This does need to be fairly randomized - see the note below this.
- Click Submit.
- Once FTP access has been setup, your hosting will be ready for upload.
Please also note the following articles, relating to FTP:
Should you require any help in regards to the above, please contact help@blacknight.com for assistance.
Comments
0 comments
Article is closed for comments.