This article relates to our Cloud VM plans only.
Important Note: Each additional IP address will cost €2 excluding VAT, per month.
You can assign an extra IP address to your VM in the Cloud Control Panel under:
Virtual Machines > vm name > Networking > IP addresses > Allocate new IP Address Assignment
On the next screen, follow these steps:
- Network Interface: Set to eth0
- Please show me used IP pool: Leave un-ticked
- IP Address: Pick any IP address from the list of available ones
- Once complete, click Add IP Address Assignment.
The final step then to have your VM be able to use the new IP address.
Note:
In addition to the instructions below - if you are running a control panel interface like Plesk on the Cloud VM, you will have to manually assign your new IP address in the control panel interface itself.
Also please note that if you add an IPv6 IP you will need to add a firewall with the source as ::/0 which is the IPv6 equivalent of 0.0.0.0/0
Windows
For Windows templates you need to setup the IP address manually on the network adapter, if you require assistance doing so please submit a support ticket.
Important Note:
Should you have the need to rebuild the network - on the Cloud VM (as below), or you do so as part of the process, the existing IP addresses on your Cloud VM will be removed and then re-added to the server (inside Windows).
There are two knock on effects from this process:
- This may cause previously assigned IP addresses to be removed from their existing configuration:
- If this is the case, you may need to manually re-associate the IPs to their respective services.
- You should try to keep a list of currently assigned IPs and their respective services.
- The source IP address, for traffic coming from the server, may change:
- This is a knock on effect, as to how IP address are automatically assigned to the network interface in Windows - where all IPs are listed as source IPs.
- This can have a negative effect on previously Whitelisted IPs/services e.g. payment gateways in use.
> In the case of Item 2
The following command should be run against all IPs that you do not require to be used for outgoing communication:
netsh int ipv4 add address "LAN" 111.111.111.111 255.255.255.0 skipassource=true
Where:
- You run the command, from within the command prompt - in Windows, and as an Administrator.
- The IP address 111.111.111.111 should be replaced with the IP address you wish to remove as a source IP.
- The Subnet Mask should match the same subnet mask as the IP address assigned.
Linux
For Linux VM's, you can add the IP manually - or you can use the Rebuild Network feature (below) to apply the IP.
Rebuild Network
You can use this feature to rebuild the network stack, for the Cloud VM, to ensure it has detected the new IP address - however, even after rebuild the network, it may still be a requirement to reboot your Cloud VM in full.
If you trigger this feature, it can take roughly 1 - 2 minutes to take effect and their will be downtime for the duration of the process - though in most cases, once the process is triggered, the outage only lasts around 30 seconds.
To trigger the rebuild, you can do so via the Cloud Control Panel for your Cloud VM, as per the following:
- Rebuild Network on the IP Addresses screen after you allocate the new IP address.
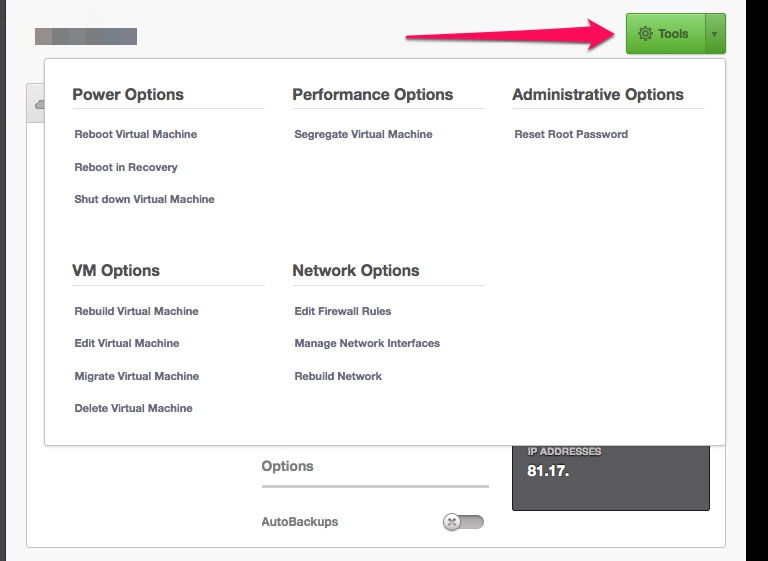
- Virtual Machines > (VM Name) > Tools > Network Options > Rebuild Network.
- See the screenshot below, to determine where this is in the control panel.
Further Queries
If you have any queries on this, please contact our Support team - see the following for our contact details:
- https://www.blacknight.com/contact-us.html
Comments
0 comments
Article is closed for comments.